I think the potential of social networks to increase traffic to your blog or website is fantastic but the problem is that the time we spend on social networks is time lost creating the actual content that is needed to get people to visit your website. So we need to automate as much as possible. Luckily there are apps that let us do post WordPress posts to Facebook automatically.
Up until today I have been using Wordbooker. I haven’t been very happy with it for a few reasons. One is that it occasionally seemed to switch off and another is that it occasionally posted to my personal Facebook profile rather than to my the Facebook page as it was supposed to. The last reason I wasn’t all that happy with it was that it had so many features that I wasn’t interested in using and I like things to be streamlined if possible.
Today the creator of Wordbooker announced on his blog that the Wordbooker plugin had been pulled from the WordPress depository for various reasons and that he was feeling quite disheartened and may not continue developing the plugin. I feel bad for him but I’m sure WordPress have good reasons for removing the plugin as there is no benefit for them to remove a good plugin.
So I searched for a replacement plugin and found one called Facebook Page Publish that seemed it would do the trick and be much tidier than Wordbooker to boot. The problem is that it wasn’t updated for a while and the installation guide is dated. So I decided to create this guide to Facebook Page Publish.
Use Facebook Page Publish to post WordPress posts to Facebook automatically
1. Install and Activate Facebook Page Publish.
2. In your WordPress settings menu click on Facebook Page Publish to see options.
3. Create a Facebook application. (Don’t panic, it’s easy!) You need to be logged in to Facebook.
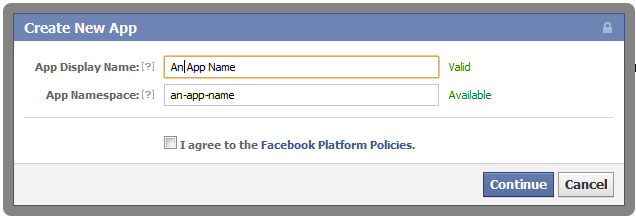
4. Click Create New App.
5. A pop-up will come asking you to name your app. The App Display Name is what visitors to your Facebook Page will see so make it relevant. I’d just use the name of the site it is promoting. (eg. The Huffington Post) and the App Namespace can usually be the same but without spaces or capital letters. Don’t worry about it too much.

Agree to the Facebook Platform Policies and click Continue.
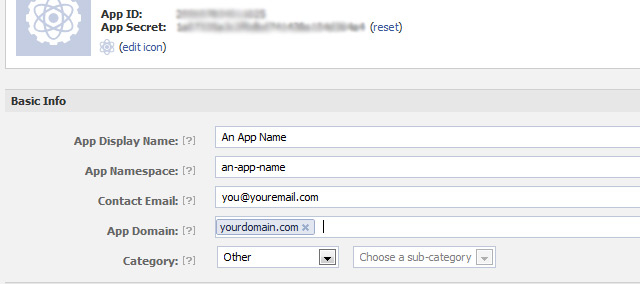
6. Add App Domain in the next page. Other areas should already be filled in. (See image below.)

7. Below that area click on Website and enter your full domain including http://.

Go to the bottom of the page and click Save Changes.
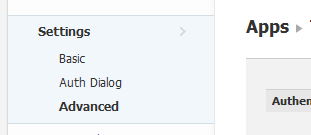
8. Click on the Advanced Tab in the sidebar:
9. You need to set deprecate offline_access to disabled. Scroll down the page and click Save. *

10. Copy and paste the Application ID Application Secret from your Facebook app (see blurred area of no. 6 above if you are not sure where it is) into the fields in the Facebook Page Publish Options page in your WordPress control panel.
11. Click Save Changes. (There will be an error message but ignore it.) Then click Grant Access. (The error message should disappear.)
12. In option 2 and 3 you can can choose some options like whether to post to profile or page and whether to include excerpt or not etc. Click save after you make your choices.
Test it? Working?
The End.
* I found this in the WordPress.org forum. I am not sure about what security risks there may be.
Other ways to post WordPress posts to Facebook Automatically
Of course there are other options out there. Just Google it and you can find them. Some are free, some are not. If you are on WordPress.com they have a great Publicize app already included. I hope they make it available for us sometime in the future.

Mario Thanks Alan… I think it’s works!
Alan Watchorn Great. Good to know.
Tyler Alas, this doesn’t work for pages, only profiles… every time I try to create a FB app, it just redirects me to my page 🙁
Alan Watchorn It works for pages because I am using it to update a FB page rather than my profile.
Tyler Actually, I sussed it out from reading some info on other plugins. It will *only* work if the page has a profile associated with it, and you have to be using FB as the profile user, not the page user. If you have a FB page that you created without using a profile, it won’t work.
Alan Watchorn Interesting. I didn’t even know it was possible to create a Facebook page without a profile.
Thanks for the details.
Adina this tutorial is great – it gives me the confident that i configure all good.However something bothering me – the fact that all other users cant’ see my posts on my facebook page and i can not see them too if i’m not logged in.
Is this normal – this is the way it works?I didn’t find anything on net about this so…i don’t really know how it supposed to work – but i guess the other users(besides me) must see the published posts…
Did anybody have this problem or it’s just me?
TY!
Alan Watchorn Can you post a link to the Facebook page.
Tyler Style That’s the way it works. If a visitor is not logged into FB, they can’t see FB content on profiles, pages, etc. All they get is the FB login page.
Alan Watchorn That’s not right. You can view Facebook pages even if you are not logged in to Facebook: https://www.facebook.com/theshirtlist
But I think there are settings for your pages that can prevent people from seeing them.
Photos Alan’s right, It’s all in how one sets up their security settings.
Diego Schlauri Hi, thanks for your tutorial, I’ve got just one problem, the image wich is linked to the post isn’t showing up on my facebook site…
what’s going wrong?
thanks
Alan Watchorn can you link to the post?
Sam It’s broken…
Smumdax Tried 3 or 4 plugins before settling with this one. Easy setup (with your guide) and simple to use. Would be nice to have a confirmation that the post was.. uh… posted to Facebook when I click “publish”, but otherwise fine and simple plugin.
Now, let’s find one similar for Twitter LOL
Giovani Olakunori Nice post.Bravo!!!
lilian Thanks, this tutorial really helped me after all the troubles.
Haziq i can not complete step 9 cuz these options are not there !! and thn im getting msg
“Some or all access permissions are missing. Please click the button Grant access rights! and authorize the plugin to post to your Facebook profile or page.
[Error occured at line 774]
Your page or profile’s access permissions could not be verified.”
What to do ?
Alan Watchorn You’ll need to contact plugin author. I don’t use this plugin anymore.
KEDTO thank you, this information is very useful